テーマ用にブロックを作成したいと思い色々と調べました。JSXで各場合は環境の構築が必要です。WordPress では環境構築を簡単に行うためのパッケージとして @wordpress/scripts(wp-script)と @wordpress/create-block を提供しています。
今回は @wordpress/scripts(wp-script)を使ってテーマにブロックを実装させる方法です。
目次
テーマのファイル構成
└── wp-content
    └── themes
        └── sample01 //使用するテーマのディレクトリ
            ├── category.php
            ├── front-page.php
            ├── functions.php
            ├── index.php
            │    ...
            └── themes-block
                      ├── build              //ビルドすると自動生成
                      ├── node_modules       // npm で自動生成
                      ├── package-lock.json  // npm で自動生成
                      ├── package.json       // npm で自動生成
                      └── src
                           ├── block.json
                           ├── edit.js
                           ├── editor.scss
                           ├── index.js
                           ├── save.js
                           └── style.scss
@wordpress/scripts をインストール
npmを使って初期化処理
プロンプトで themes-block に移動して次のコマンドを実行
$ npm init -y以下のpackage.jsonができる
{
  "name": "themes-block",
  "version": "1.0.0",
  "description": "",
  "main": "index.js",
  "scripts": {
    "test": "echo \"Error: no test specified\" && exit 1"
  },
  "keywords": [],
  "author": "",
  "license": "ISC"
}
ビルドコマンドを追加する
"build": "wp-scripts build"{
"name": "themes-block",
"version": "1.0.0",
"description": "",
"main": "index.js",
"scripts": {
"test": "echo \"Error: no test specified\" && exit 1",
"build": "wp-scripts build"
},
"keywords": [],
"author": "",
"license": "ISC"
}@wordpress/scripts をインストール
$ npm install --save-dev --save-exact @wordpress/scripts「package-lock.json」「node_modules」が自動的に生成されます。
フォルダとファイルを作成
以下のフォルダとファイルを作成します。
└── src
     ├── block.json
     ├── edit.js
     ├── editor.scss
     ├── index.js
     ├── save.js
     └── style.scss
以下、それぞれのファイル内容を書き込みます。
サンプルブロックのスクリプトを例にしています。
block.json
{
	"$schema": "https://schemas.wp.org/trunk/block.json",
	"apiVersion": 2,
	"name": "block-namespace/block-slug",
	"version": "0.1.0",
	"title": "title",
	"category": "widgets",
	"icon": "smiley",
	"description": "Example static block scaffolded with Create Block tool.",
	"supports": {
		"html": false
	},
	"textdomain": "block-slug",
	"editorScript": "file:./index.js",
	"editorStyle": "file:./index.css",
	"style": "file:./style-index.css"
}
edit.js
/**
 * Retrieves the translation of text.
 *
 * @see https://developer.wordpress.org/block-editor/reference-guides/packages/packages-i18n/
 */
import { __ } from '@wordpress/i18n';

/**
 * React hook that is used to mark the block wrapper element.
 * It provides all the necessary props like the class name.
 *
 * @see https://developer.wordpress.org/block-editor/reference-guides/packages/packages-block-editor/#useblockprops
 */
import { useBlockProps } from '@wordpress/block-editor';

/**
 * Lets webpack process CSS, SASS or SCSS files referenced in JavaScript files.
 * Those files can contain any CSS code that gets applied to the editor.
 *
 * @see https://www.npmjs.com/package/@wordpress/scripts#using-css
 */
import './editor.scss';

/**
 * The edit function describes the structure of your block in the context of the
 * editor. This represents what the editor will render when the block is used.
 *
 * @see https://developer.wordpress.org/block-editor/reference-guides/block-api/block-edit-save/#edit
 *
 * @return {WPElement} Element to render.
 */
export default function Edit() {
	return (
		<p { ...useBlockProps() }>
			{ __( 'title – hello from the editor!', 'block-slug' ) }
		</p>
	);
}
editor.scss
/**
 * The following styles get applied inside the editor only.
 *
 * Replace them with your own styles or remove the file completely.
 */

.wp-block-block-namespace-block-slug {
	border: 1px dotted #f00;
}
save.js
/**
 * React hook that is used to mark the block wrapper element.
 * It provides all the necessary props like the class name.
 *
 * @see https://developer.wordpress.org/block-editor/reference-guides/packages/packages-block-editor/#useblockprops
 */
import { useBlockProps } from '@wordpress/block-editor';

/**
 * The save function defines the way in which the different attributes should
 * be combined into the final markup, which is then serialized by the block
 * editor into `post_content`.
 *
 * @see https://developer.wordpress.org/block-editor/reference-guides/block-api/block-edit-save/#save
 *
 * @return {WPElement} Element to render.
 */
export default function save() {
	return (
		<p { ...useBlockProps.save() }>
			{ 'title – hello from the saved content!' }
		</p>
	);
}
style.scss
/**
 * The following styles get applied both on the front of your site
 * and in the editor.
 *
 * Replace them with your own styles or remove the file completely.
 */

.wp-block-block-namespace-block-slug {
	background-color: #21759b;
	color: #fff;
	padding: 2px;
}
index.js
/**
 * Registers a new block provided a unique name and an object defining its behavior.
 *
 * @see https://developer.wordpress.org/block-editor/reference-guides/block-api/block-registration/
 */
import { registerBlockType } from '@wordpress/blocks';

/**
 * Lets webpack process CSS, SASS or SCSS files referenced in JavaScript files.
 * All files containing `style` keyword are bundled together. The code used
 * gets applied both to the front of your site and to the editor.
 *
 * @see https://www.npmjs.com/package/@wordpress/scripts#using-css
 */
import './style.scss';

/**
 * Internal dependencies
 */
import Edit from './edit';
import Save from './save';
import metadata from './block.json';

/**
 * Every block starts by registering a new block type definition.
 *
 * @see https://developer.wordpress.org/block-editor/reference-guides/block-api/block-registration/
 */
registerBlockType( metadata.name, {
  title:    metadata.title,
  icon:     metadata.icon,
  category: metadata.category,
	/**
	 * @see ./edit.js
	 */
	edit: Edit,
	/**
	 * @see ./save.js
	 */
	save: Save,
} );
ビルドを実行
$ npm run buildbuild ディレクトリが作成され、コンパイルされたブロック用のスクリプト(index.js)とアセット用のファイル(index.asset.php)が生成されているはずです。
テーマでブロックを読み込み
基本的には、functions.php に記述することで実装します。
// index.asset.php をインクルード
$asset_file = include( get_theme_file_path('/themes-block/build/index.asset.php'));
// ブロックのスクリプトを登録
wp_register_script(
'test-theme-block-script',
get_theme_file_uri('/themes-block/build/index.js'),
$asset_file['dependencies'], //依存しているスクリプトの配列
$asset_file['version'] //バージョン
);
//ブロックタイプの登録
register_block_type(
'block-namespace/block-slug',
array(
//エディター用スクリプトにブロック用スクリプトのハンドル名を指定して関連付け
'editor_script' => 'test-theme-block-script',
)
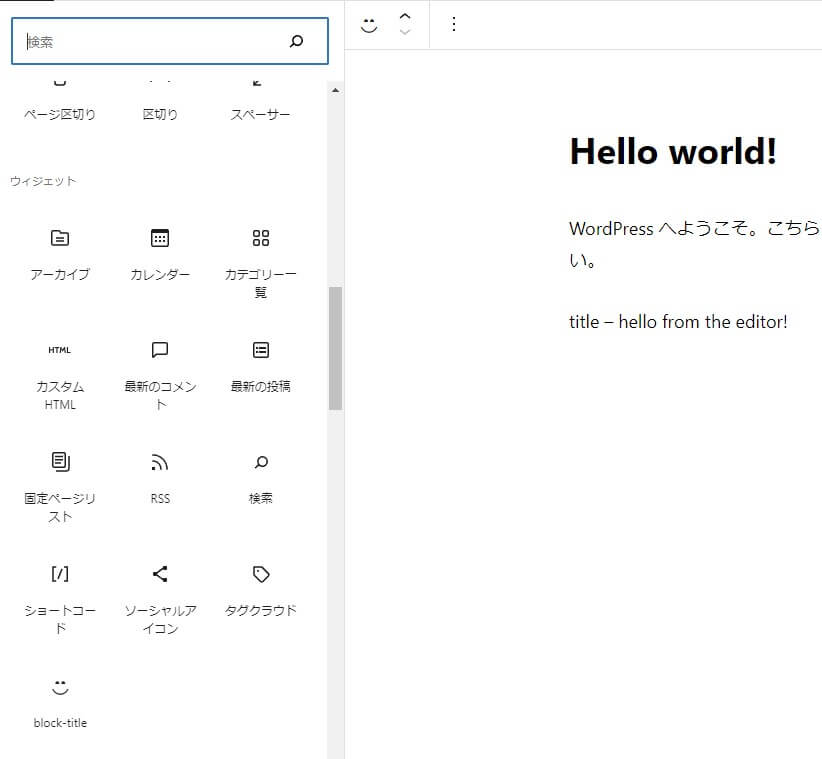
);ブロックの動作を確認
WordPressにログインしてブロックを確認すると、ウィジェットカテゴリにニコちゃんマークのブロックが 追加されているのがわかると思います。
まとめ
@wordpress/create-block を使っても同じように実装可能かと思います。ただ、フォルダ階層が増えるので気持ち的に、@wordpress/scripts(wp-script)でやりたいなって思います。
ブロックは、複数実装させたいと思いますよね?実は公式では出ていない方法で複数のブロックを実装する方法があります。それは後々、説明したいと思います。


コメント